Light
The sensitivity of our eye is much more than the sensitivity of the camera!
Always take in consideration the Ambient Light on locations. (The received light in the environment)
Remember to use as much ambient light as you can and also think what kind of lighting can be used. Moving quickly through different location scenes can be difficult to use tungsten lights.
-Be aware of ambient light and general conditions of location
-Notice the dark areas - when becoming grain and noisy
always ask yourself:
CAN I SEE IT?
IS IT OVEREXPOSED /BURNED OUT?
make sure that the light on the skin is white!
Reflected light is really important
- use the ND of the camera to enable sunglasses when in sunlight
- use reflector board /white sheet/white t-shirt
- aluminum works as a mirror (you can crush up a bit the aluminum sheet to reflect in variety)
Shadows are our friends! - shadows make the images look more real and give depth and dimension.
Dimension is important in the image
Light can tell us the narrative as well as inform the viewer understand what time of the day is and also provide a sense of where we are.
-light can give a natural look to environment thats normal
-change of lighting can give a different look thats up normal.
The style of film can also be determine from the usage of different lighting
KEY : Hi-Key bright light overall level of lighting/more colors
Low-Key not too bright light /a lot of shadows/ex. X-files, Films Noir
TRUST YOUR INSTINCT! if a it doesn't feel good change it/ let your emotion and instinct to guide. How do you want your project to fell?
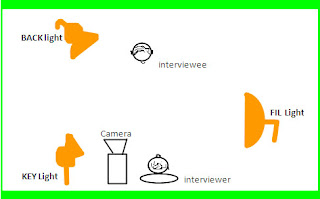
3 Point Lighting
 Placement of light
Light source
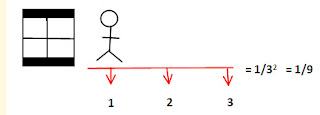
 Inverse Square Log
Keep people reasonably close to the light source
Always remember to do White Balance. It should always be done before starting filming in order to choose the correct light environment. Light has different hue and color.
Yellow - inside / Tungsten =3200 k yellow hue
Blue - outside / Daylight = 5600k blue hue
SOUND
Think separate of image and sound. First test the locations of filming to identify the ambient noise.
When record interviews the sound should be "SYNC" synchronized sound lipsync - sound and lips of the interviewee should be synchronized and matching.
voice, facial features and how they communicate are really important so avoid recording the sound later and try to sync with the lips of the interviewee.!
Ambient Sound -consider locations sounds when recording
Dead rooms are more preferable for recording
Avoid rooms with echo (echooo ooo oo) add foam material - absorb sounds
Dead sound is really important
Picture should matches the sound on the background - the worst sound is the one out of your frame that interferes within.
When editing be careful with the background noise to have a continuity. To avoid this always record a BUZZ track - an ambient sound of your location and record it as separate track.
Don't be shy to ask someone to STOP making noise if interfere with your ambient sound and visual.
Drill/ A/C should be turn off at all times when recording
Wild track record specific noises in dead rooms that need to be record more closely. (Steps, animal sounds)
Narrative recording should be in a dry location with dead sound.
Music- try to find copyright free music in that way your video clip can reach a wider range of audience.
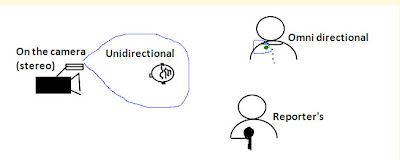
Mic's


No comments:
Post a Comment